A complete and objective guide to packing light .
Many people are impressed when I tell them I spent three weeks in Southeast Asia traveling with just a carry-on, or that the four of us spent an entire month in Japan with only three carry-ons. And then, not long after that, we went back in winter for the longest trip of my life, through Japan, South Korea, and the Philippines, once again with just one carry-on per person. Yes, those standard cabin-size suitcases, up to 10 kg, that you bring on the plane with you.
I’ve always been a fan of traveling light, but, as with everything in life, over time we gain experience and evolve.
So, let’s get to it. Here, I’ve gathered some objective and quick tips to help you learn how to travel with only a carry-on, lightening your load and bidding farewell to all the hassles associated with giant, heavy, expensive, and potentially lost luggage.
First of all, follow me on Instagram @danae_explore – that’s where you can keep up with my trips, find lots of travel tips, and send me a DM anytime. I love chatting about travel!

How to travel with only a carry-on?
.
1 – Research the destination
The first thing to do is research the destination: climate and temperature during your visit.
Is it cold? Hot? Rainy? Dry? Windy? How much cold and how much heat?
Consider the activities you’ll be doing : urban excursions, upscale restaurants, hiking, beach, mountains, theme parks, museums, sports, skiing… Will you spend a lot of time outdoors? Are you attending a social event (wedding, party, etc.)?
Research if there’s any specific dress code at the destination. For example: in Southeast Asian temples, it’s necessary to wear clothes that cover shoulders and knees, that are not tight or transparent; in various Islamic countries, wearing a veil (hijab) is required, and so on.
In short, do your research!
This will give you an idea of the type of clothing you need to bring.
.
Here are the websites I always use to plan my trips:
– 🛌 Accommodation: Booking
– ☀️ Tours & activities: Civitatis & Get Your Guide
– 📱 eSIM for mobile data: Airalo e-SIM – use promo code DANAE2375
– 🚗 Car rental: RentCars – use promo code DANAE

.
2 – Make a list of everything you will need to pack
Knowing what kind of clothes you need to bring, it’s time to make a LIST of items.
List all the pieces and the quantity of each, considering the duration of the trip and the activities you’ll be doing, then create a packing list.
I usually bring enough clothes for 8 days of travel and I’ll wash them throughout the trip.
.
.
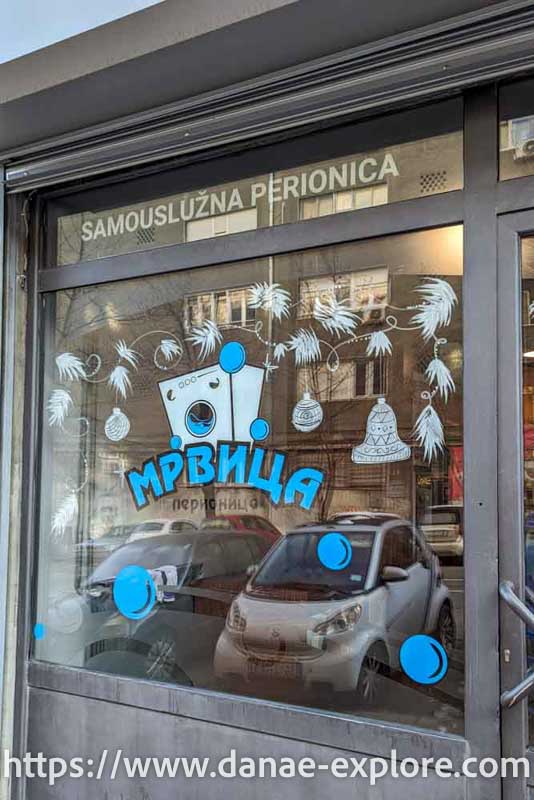
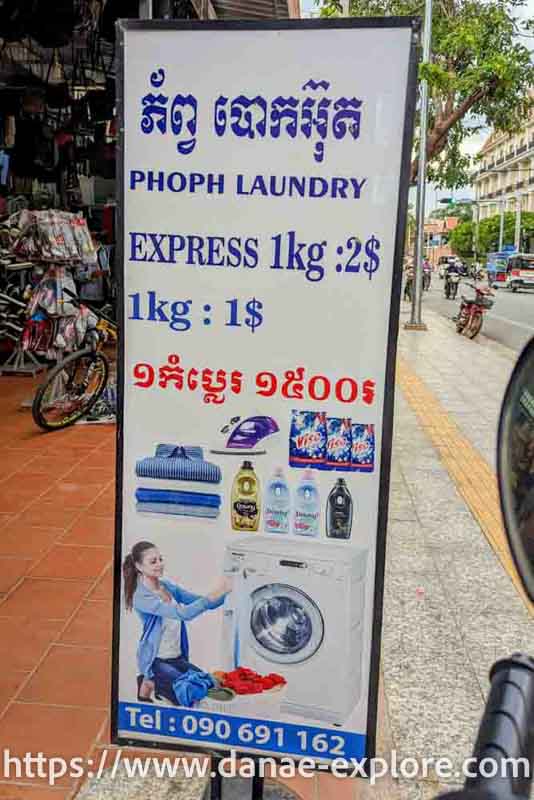
Doing laundry while traveling?
Yes, washing clothes while traveling is not a problem, it is the solution!
Nowadays, with very few exceptions, it is easy, quick and inexpensive to have your clothes clean and fresh anywhere in the world. Research and gather information before you depart.
I plan to be in accommodation with a washing machine and dryer available to guests at least one day each week. In Airbnb listings, washer-dryer combos are becoming increasingly common (add it to your filters when searching), and many hotels (especially in the US, Canada, and Japan) have ‘coin laundry’ in common areas – laundromats with various self-service machines that operate with coins and cost a little, around $1-3 per cycle. I’ve stayed in hotels in Japan that had a washing machine in the room! Booking.com also allows these filters; check them out:
.


.
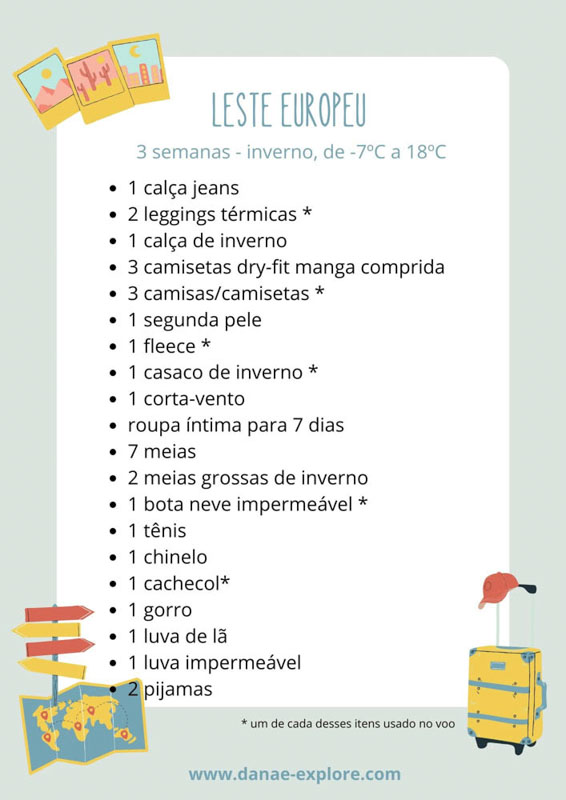
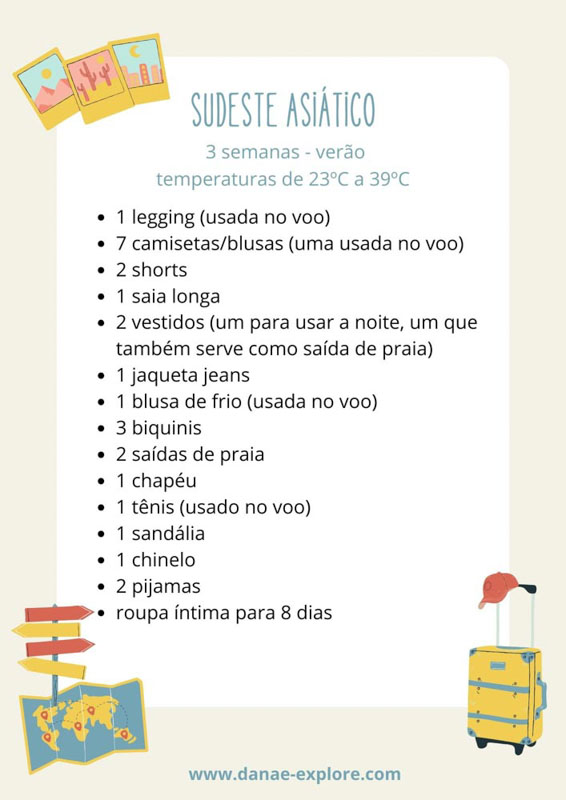
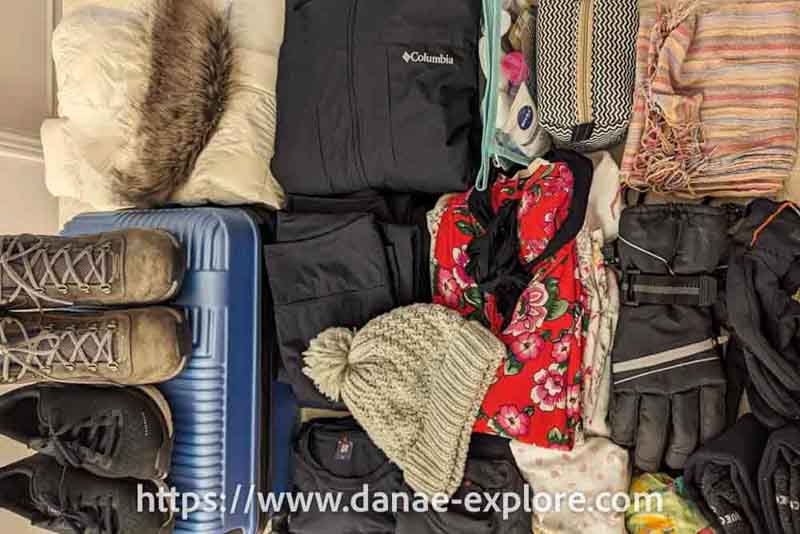
Here’s the list of what I took on two trips to completely different destinations, with varying durations and temperatures. There’s a winter trip list , as well as what I packed for a 3-week trip summer Southeast Asia trip, which combined urban sightseeing and beach time in the summer.
.
.
3 – Choose a versatile color palette and clothes
The most important part: define a color palette and choose pieces that match each other! Mix and match is the way to go while traveling. Versatile items that you like and can be used with each other.
All tops should match all bottoms. Jackets/coats should match all combinations of tops and bottoms. If necessary, cold-weather tops and jackets should be compatible to be worn together, layered, one over the other.
To make things easier, the ideal is to have a set of colors – 2 base colors and 1 or 2 colorful ones – and choose pieces within those colors, so there won’t be any mistakes in mixing and matching.
For example, I always go for black + white/off-white (base colors) + jeans + a stronger color. My color palette looks something like this:
.

.
Bonus tip:
Choose parts Choose easy-to-wash pieces that can be dried in the dryer, don’t need ironing, and, if possible, are not bulky (especially if it’s a trip to a cold destination!)
And, always, the bulkiest pieces go on the body!
.
.
4 – Limit shoes
Bring a MAXIMUM of 3 pairs of shoes.
Exactly: 3 pairs, including flip-flops. The largest one goes on your feet.
If you choose well, on vacation trips you will hardly need more than three pairs of shoes.Shoes are often the bulkiest item in the poor-quality, so in that department, anything you can save is highly rewarded 😉
Always take shoes that you are used to – if necessary, wear them for a few days before traveling, to avoid surprises, blisters and discomfort.
.
.
5- Hygiene & skin care items
For a long time, this was my Achilles’ heel when it came to packing. I remember checking in luggage just because of toiletry items.
But there comes a time when necessity aligns with experience, and you become an expert on the subject 🤣 🤣 🤣
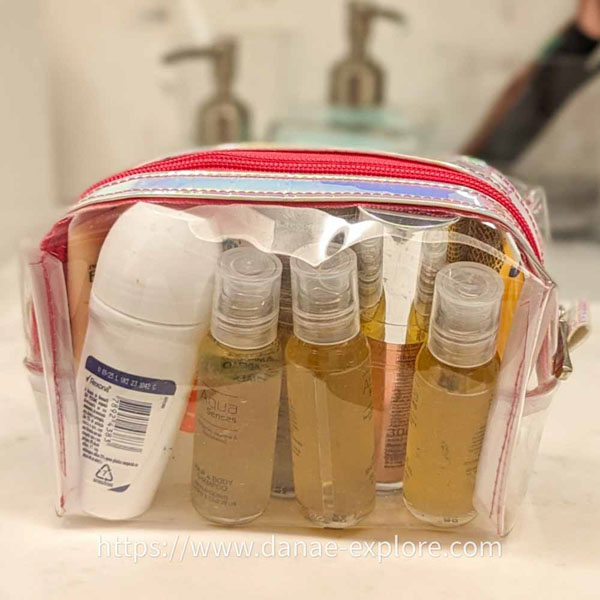
Jokes aside, this part of luggage can undermine your intention to travel with just a carry-on. So pay close attention: in the department of creams, liquids, and the like, what I can say is
REDUCE
- Reduce volumes
- Reduce quantities
- Reduce needs
.
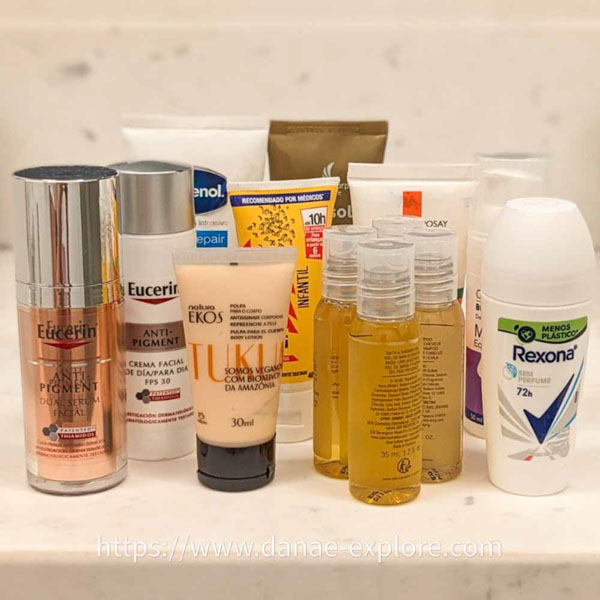
Put everything in 100ml containers (the maximum limit allowed for any single container in carry-ons). Shampoo, conditioner, leave-in conditioner, moisturizer, sunscreen, insect repellent—you name it! If you can’t find the product in this size, transfer it from the larger bottles to smaller ones. I sometimes buy small bottles at these thrift stores, but whenever I come across something in a bottle smaller than 100ml, I leave it clean and ready for the next trip when I’m done (which is great for both my wallet and the environment).
If something runs out during your trip, it’s easy to replace. There are markets and convenience stores everywhere in the world. Even if the price is a bit higher than in your hometown, this “surcharge” will certainly be cheap considering the peace of mind that traveling light provides. Normally, buying this type of item at the destination is usually an insignificant cost of the trip, believe me.
Ask your dermatologist (or search online) for minimalist skin care alternatives to use during the trip. If at home I use 4 or 5 different products, during travels it’s only 2. The most important thing is sunscreen, which is available everywhere in the world.
Hairdryer, straightener, curling iron, and the like: needless to say, leave them all at home and make do with what you find at the accommodations.
.
.
6 – Medicines
No one likes to get sick while traveling — I probably don’t even need to mention the importance of travel insurance, right?
But since minor discomforts and accidents do happen, I always carry a small toiletry bag with basic medications:
.
- painkillers and fever reducers (I used to bring a thermometer when the kids were little, but not anymore)
- gastric discomfort kit
- insect bite relief
- ointments or supplies for scrapes and bruises
- other essentials, depending on the destination and any specific needs of each traveler
.
The goal here is to bring just the essentials — enough to get through 3 or 4 rough days . If you end up using anything during the trip, you’ll have time to find a replacement locally. Truth is, after many trips over the years, we’ve almost never had to restock these items while on the road.
We also pack any daily-use medications for the entire trip. Usually, I transfer them to more compact containers and leave the bulky blister packs at home (probably not pharmacist-approved, but I do it anyway 😅).
Organizing your meds properly in your luggage makes a big difference: one toiletry bag holds the daily medications (ALWAYS in hand luggage, to avoid loss), and in another toiletry bag go the emergency use medications – this toiletry bag, if all goes well, enters and exits the suitcase untouched.
.

.
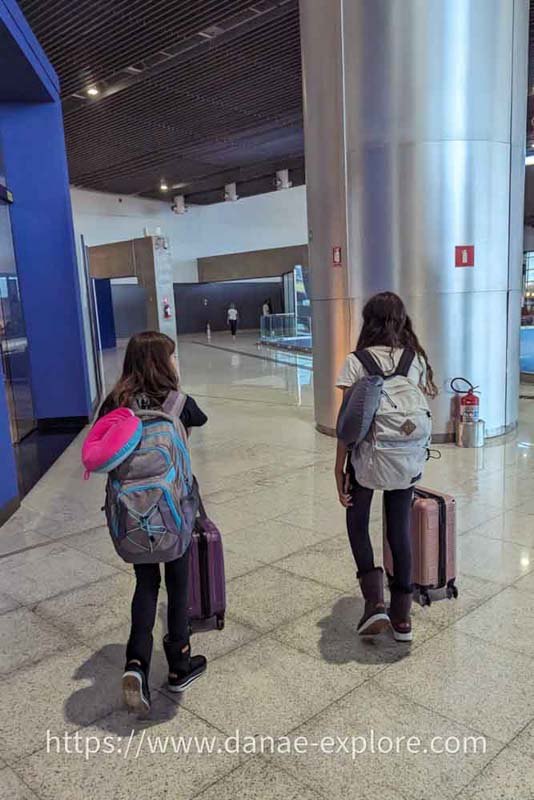
7- Choose your luggage wisely
Just as important as thinking about what goes in your suitcase is choosing the right suitcase to fit it all.
You may be used to always using a backpack, a suitcase with wheels, or a duffel bag, and this is a factor to take into consideration, but it’s important to think before making this choice. My suitcase with wheels is this one from Sestini, I love it, super resistant and the best value for money.
Will there be hiking and camping involved? Rustic lodges in hard-to-reach areas? Charming little inns tucked away in the historic centers of old towns (hello, European villages!)? Lots of stairs to climb? Hopping on and off metros and buses with your luggage in tow? In any of these cases, go with a backpackMine is 50 liters (it’s one of the small ones), I love it!
Doing a road trip? Traveling through cities with minimal luggage movement? A duffel bag can be a great option — and so can wheeled suitcases.
Planning to stay at multiple hotels, take trains, metros, and planes, but mostly walking on paved sidewalks, using escalators and elevators? Wheeled suitcase all the way!
In the end, there’s no right or wrong when it comes to choosing your luggage — just what best fits your destination and makes you feel most comfortable.
Just make sure to pay attention to the size and weight limits for carry-ons, as I explain in the next section.
.

.
8 – Attention to the weight and size of the carry-on
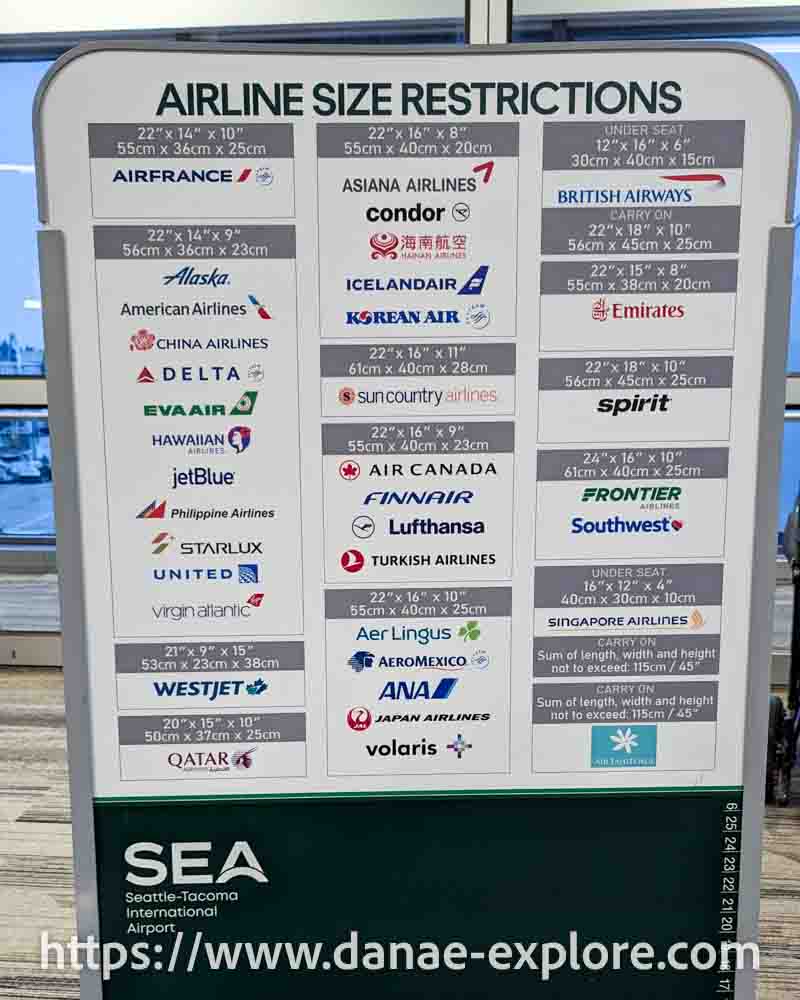
You might think it’s all the same, but carry-on size and weight limits can vary a lot from one airline to another.
Usually, for domestic flights in Brazil, the maximum size of carry-on baggage allowed is 55cm x 35cm x 25cm. For international flights, be careful as it can be quite different – look at the photo below, which shows the limits of the main airlines operating at Seattle Airport, USA, just to give you an idea of how this varies.
The weight also varies a lot: 10kg is usually common, but many companies adopt lower limits, such as 7kg or 8kg.
Often, within the same airline, some flights have a limit and other flights have a different limit – this can vary according to the aircraft model as well.
The important thing is to check your ticket and, in doubt, contact the airline to confirm.
Another important point: if you are traveling with children, you are entitled to take a stroller. The ideal is a foldable baby stroller that you can take inside the plane cabin. Check with the airline for accepted dimensions.
.

.
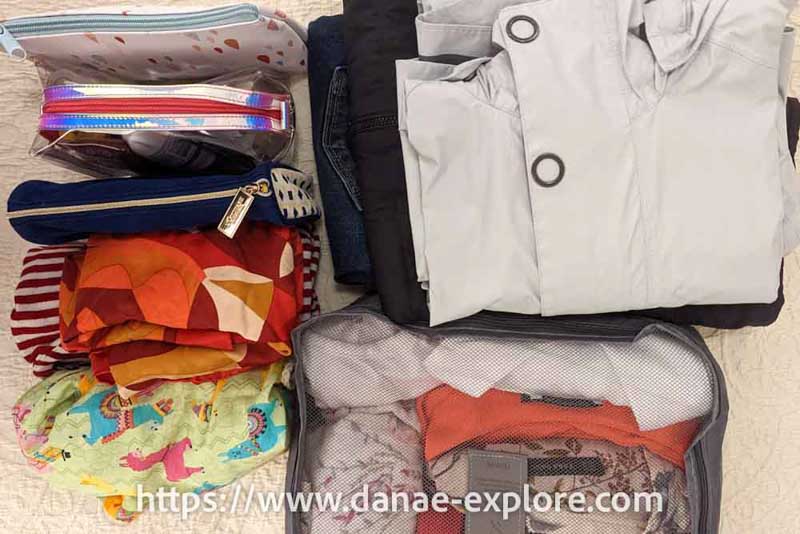
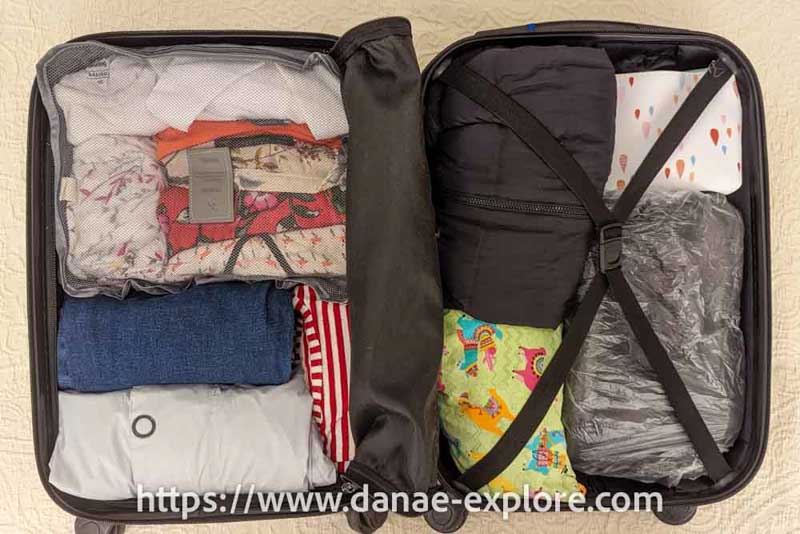
9 – Organize everything inside the suitcase
Once you’ve made your list and laid out all the items, it’s time to actually pack the suitcase.
Don’t start packing while you’re still deciding what to take. Make sure everything is selected, clean, and folded before you begin . That way, organizing it all — and keeping things accessible throughout your trip — becomes much easier.
Packing cubes can be allies at this moment. I like to use them when traveling with a backpack or when more than one person shares the same suitcase.
I organize the contents by category — it makes it way easier to find things later. Pants in one corner, shorts in another, tops over there, underwear in one small pouch, socks in another… you get the idea.
.
.
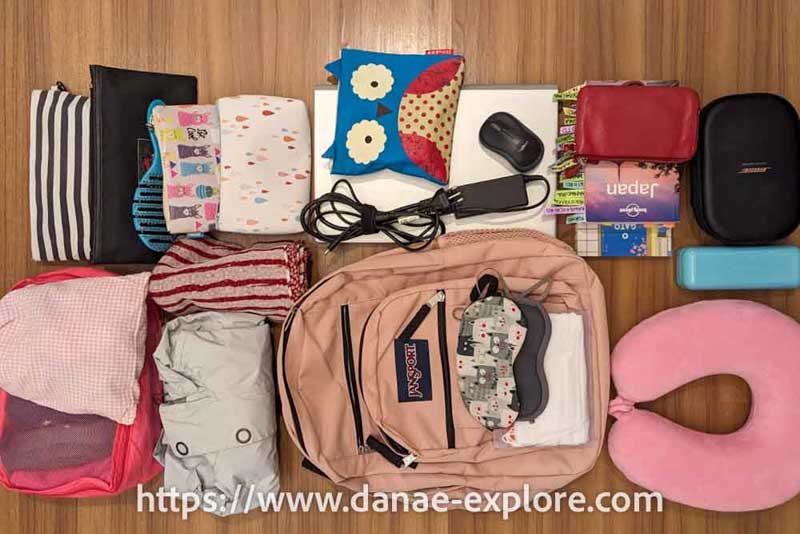
10 – Personal item (a.k.a. your “hand bag”)
In addition to your carry-on suitcase, airlines allow a smaller personal item“, smaller in size, which fits under the seat or on your lap. Think of it as your school bag or backpack.
I usually carry in my backpack:
– cell phone
– wallet and documents
– sunglasses
– laptop and charger
– plug adapters
– cell phone charger (but a good charger, right?)
– camera (mine is Canon Mirrorless R)
– headphones
– eye patch (essential for night flights)
– neck pillow
– for long-haul flights: a small toiletry kit with the essentials I’ll need mid-flight — toothbrush, hairbrush, moisturizer, headache meds, etc.
– makeup kit
– reusable water bottle (yes, you can bring it through security as long as it’s empty)
– a book and a pen
.
.
11- Enjoy the trip
Now it’s time to enjoy the journey — light and easy.
Packing is an art we get better at over time. Through trial and error, picking up tips along the way, we eventually find what works best for us — which might be completely different from what works for someone else.
There’s no magic formula, no one-size-fits-all method.
Some of the strategies I use might sound helpful, others might seem a little out there (haha), but if you’ve made it this far, I’m guessing something resonated with you. And if you’ve tried or adapted anything I mentioned, let me know — I’d love to hear about it!
.
.
These tips apply to any kind of trip — whether you’re flying, driving, taking a train, cruising, hopping on a bus, or even riding a tuk-tuk Because traveling light isn’t just about avoiding airport stress or saving on baggage fees — it’s a mindset. A way of traveling (and living) that’s lighter, freer, and open to whatever new experiences the adventure brings.
What would you add to this list? Share it in the comments, here or over on Instagram — I’d love to learn from you too!
Here are the websites I always use to plan my trips:
– 🛌 Accommodation: Booking
– ☀️ Tours & activities: Civitatis & Get Your Guide
– 📱 eSIM for mobile data: Airalo e-SIM – use promo code DANAE2375
– 🚗 Car rental: RentCars – use promo code DANAE
Check out more posts with practical tips to make your next trip a breeze:
- How to plan a vacation – 10 simple and practical steps
- How to travel with only a carry-on
- Complete guide to flying with low-cost airlines: how to avoid hidden fees and costly mistakes
- 8 tips to avoid jetlag and enjoy your vacation from day one
.
Did you like these tips? Then follow me on social media:
Instagram @danae_explore
Pinterest @danaeexplore
Comments or questions? Contact me on social media! I love to chat about travel 😉
And before you go, don’t forget to SAVE THIS PIN to your PINTEREST accountto easily find this step-by-step guide on how to travel with only a carry-on whenever you need it!